
Google Plus Shared Circles Guide And Tutorial
I have touched on Google Plus Circles before in my Google Plus Guide and Tutorial but have recently been asked for details on how specifically you would make a Shared Circle.
This is moving us into the more advanced use of Google Plus so i would urge you that before you get into this and read on to firstly go back and read my Google Plus Guide and Tutorial, it is broken down into sections so you will probably not have to read all of it but please save yourself sometime and review the guide otherwise this post is likely to make your brain seize up 😉
So How To Create A Google Plus Shared Circle
In this post we will cover
- What a shared circle is and it’s uses
- Steps to creating a shared circle
- How to promote your shared circle
To follow this advanced tutorial to the end you will need to have at least the Free Version Of Circloscope, you can download the Free Version Here
What Is A Shared Circle And It’s Uses
A shared circle is specifically a circle that you create full of active members that you then share to the Google Plus Platform for other members to then join.
Throughout this guide i will use my Google Plus Engagement Shared Circle as the example. But first some background on why i created my circle.
I have a community on Google called the Google Plus Engagement Community.
It is a community that i created for the most active people on Google Plus, the idea is that it doesn’t matter if you have 5 or 5000 followers your still gonna get incredible engagement around what you post because the community is a group of people all looking for engagement, you post your content the members then +1, comment and share.
The advantage you have in the community is that we have almost 10000 members now so it is basically just like having 10000 circle followers of your own.
It works incredibly well if your new to Google Plus and have just a few followers because when you post in the community your content is on show to 10000 members and when they share it goes to their followers as well and possibly even their extended followers.
If you have say 100, 500 followers and post public your gonna be lucky to get a few +1s when you post public, its very different in the community 😉
The community is then also backed up with the Google Plus Engagement Page with close to 8000 followers, and the idea of the page is to share the best content from the community to the page for extra value for the members, so not only is your content seen by 10000 community members its also seen by 8000 page followers. We often get over 100+1s on content shared to the page again because the followers are targeted engagers.
The Google Plus Engagement Circle is really the final piece of the Google Plus Engagement Puzzle, as mentioned before it is mainly curated community members who are very active, who are willing to share and looking to grow their followers, this in turn grows the Community Members and Page Members.
The Google Plus Engagement Circle is not only for community members anyone can join but when they join they have to follow a set of qualification instructions to get added, we will talk more about that later.
The main purpose of any shared circle is really to grow your followers because one of the main qualifications on just about every shared circle is that you have to add all the circle members to your followers so if your in a shared circle and its popular and people are sharing it and new people are joining, then your followers are going to grow. And in the case of the Engagement Circle the community members and page members also grow.
Steps To Creating A Shared Circle
Ok so here we go, im going to now show you how i create my Google Plus Engagement Circle.
Go to the Google Plus Home Page or your Profile Page and on the top left below the Google Logo is a pull down menu, pull down and select People then on the next page select Your Circles and this will take you all the circles you have created.
This is where it starts to get a little bit more involved and again please if your new or you have not read the previous posts of this guide then skip back and have a read before you go on
The Google Plus Engagement Circle is created from two other circles that i have.
I have a circle where i have my pages so in this circle i have InfoBunny, my CashUnite page my IQKonnect page, you can have any number of your own pages.
InfoBunny Pro Tip
Add all your pages to your pages circle so that all pages get new followers from the Circle Share 😉
I also then have an Engagers Circle this is the bulk of the members of the Shared Circle, this is the circle that i add people who want to join the shared circle or those who i want to include and the Google Plus Engagement Shared Circle is created from these two circles.
If you look at the image below you can see that the circle count is higher on the Engagers Circle than the Google Plus Engagement Circle because as i said new members get added to the Engagers Circle first and then the Circle Share is then updated using the Engagers Circle.
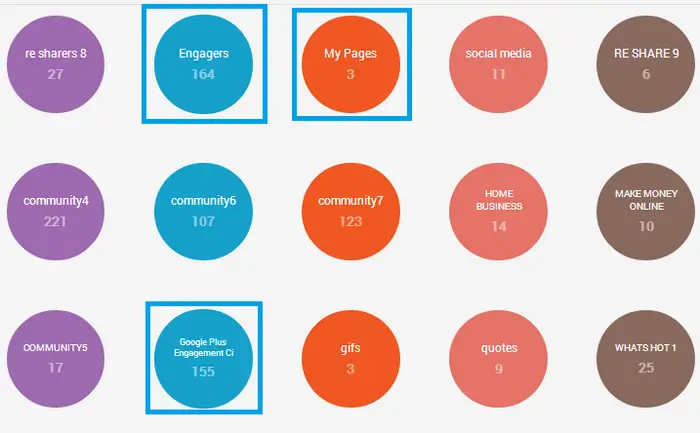
Now we create the Shared Circle and give it a name, in my case i always delete the old shared circle first and create the new shared circle from my Engagers Circle and My Pages Circle.
Remember the Engagers Circle is the Circle that has the new and existing members who want to be added to the new circle or the circle update.
They then get added into the Circle Share for members to share and comment and plus 1 and etc etc
Click the + button to create your circle and give it a name and save.

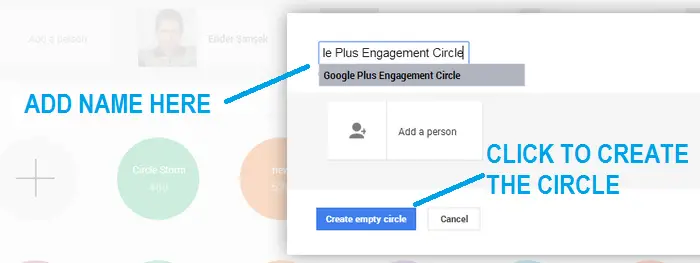
Now you can add members to your Shared Circle so in this example i add all the members from my Engagers Circle and my pages from the My Pages Circle.
Open the circle you want to add then and on the Actions Pull Down Menu Select All
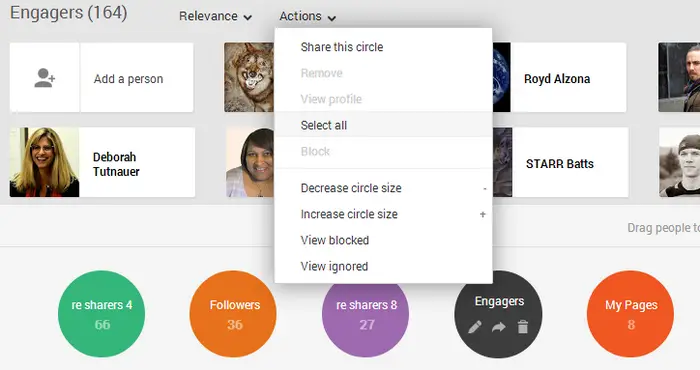
then drag all the members into your empty circle
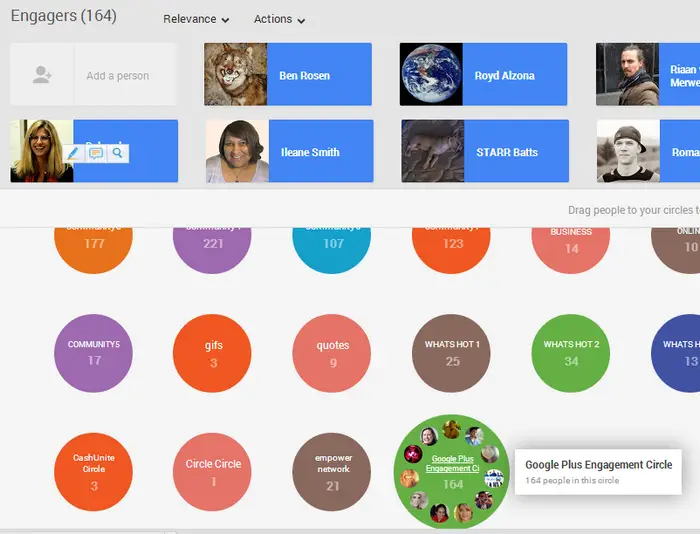
then repeat the process with the next circle in my case its my My Pages Circle
Now it is time to share the circle but first we must be clear on the qualifications for new members to be added to the circle. We want to add to the Circle Post that all members must +1, they must re-share and they must comment that they have completed the steps to be added and that they must circle all members.
Here is what i add to my shared circle, this will give you some ideas……………….
Please SHARE to reveal the qualifications that i add to my Circle Share
[sociallocker id=”4430″][/sociallocker]Google Plus Engagement Circle Share UPDATED 29/07/2014
READ THE FULL INSTRUCTIONS
PLEASE ADD ALL COMMENTS AND +1S AND RE-SHARES TO THE GOOGLE PLUS COMMUNITY POST SO WE CAN KEEP ALL POSTS TOGETHER SO WE DON’T MISS ANYONE ON THE NEXT UPDATE
COMMUNITY POST IS HERE
This is a brand new circle share that i have created to run alongside our Google Plus Engagement Community and Page
https://plus.google.com/u/0/communities/114073514168507051487
https://plus.google.com/u/0/+InfobunnyGooglePlusEngagagement/posts
I created the community to bring together individuals who want to engage and want engagement to their content and if you visit you will see its growing fast and does have ever growing engagement.
Here are a couple of goals that i have for the community
1/ To become BIG i would like to see 10000+ members – It’s very achievable!
2/ I want the community to have the power to send a member post into the Whats Hot section again this is achievable
This Circle Share is the next phase of our growth!
Here is how it works
To Get ADDED TO THE Google Plus Engagement Share
1/ Add ME To Your Circles
*https://plus.google.com/u/0/+DexterRoona/posts*
2/ Add The Circle Members To Your Circles
3/ Plus 1 This Post
4/ Re-share This Post
5/ Comment And Ask To Be Added
6/ Join The Google+ Engagement Community
https://plus.google.com/u/0/communities/114073514168507051487
7/ Follow and +1 our Google+ Engagement Page
https://plus.google.com/u/0/+InfobunnyGooglePlusEngagagement/posts
8/ Follow and +1 our Google+ Circle Share Page
https://plus.google.com/+Infobunny-google-plus-circle-share/posts
If your reading this as a Re-Share please make sure you +1 and comment on the original post or you may get missed on the next update.
We will be updating the Circle Share once per week.
All Steps Must Be Completed….. And that is it.
Members promote the circle, new members join the community and add the circle members to their followers and as a result the community grows, our engagement and interaction to our posts grows and we get more followers.
To your Continued Success!
#circleshare #circlesharing #engagement #publicsharedcircles#getfollowersfast #googleplusengagement
On the pull down menu on your circle under Action select Share This Circle and then add in your qualifications and click share
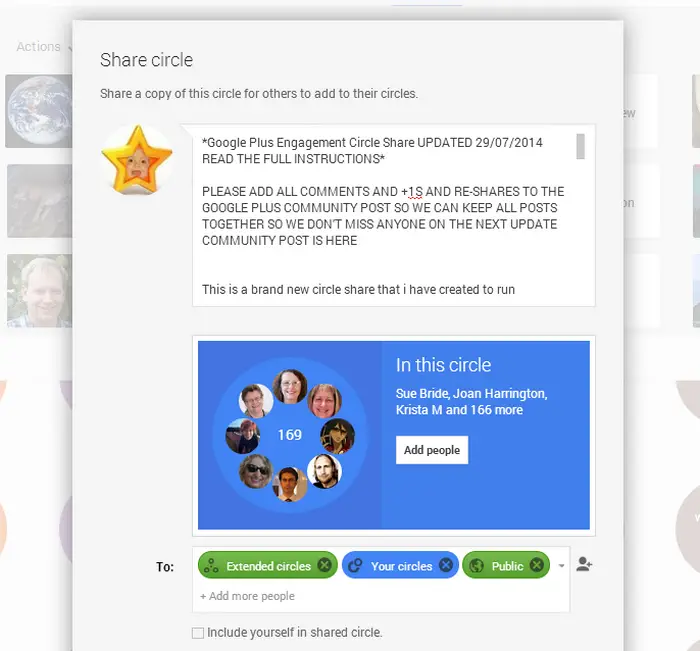
If you then go to your profile page you will see your newly shared circle.
How To Promote Your Shared Circle
So now it is time to get creative and promote your new circle.Now the goal here is to really get the word out about your circle.
As mentioned right at the start of this post the Google Plus Engagement Circle is part of both the community and the Google Plus Engagement Page and there is also a page specifically for the Google Plus Engagement Circle Share, remember we deleted the previous Engagement Circle when we made this new update, well we have every update archived on our Circle Share page so every share of the circle can be found by Google.
So here are my specific promotion steps
I login to the Google Plus Engagement community as +GooglePlusEngagement and go to my +dexterroona profile page and re- share the circle to my community that puts the Circle on both the community and the Engagement Page, i then also make the Community Post Sticky so it stays at the top for all members to see.
Next i login under my Google Plus Engagement Circle Share Page and go to the Engagement Community and re-share the pinned post to the Circle Share page, so effectively archiving the circle with all the previous updates.
You can then if you wish find some Circle Sharing Communities and add your circle to them as well and you can also add your circle to the Circle Count Site if you wish, that is worth doing if you have time.
There are a couple of other things that i do to really finish off my promoting.
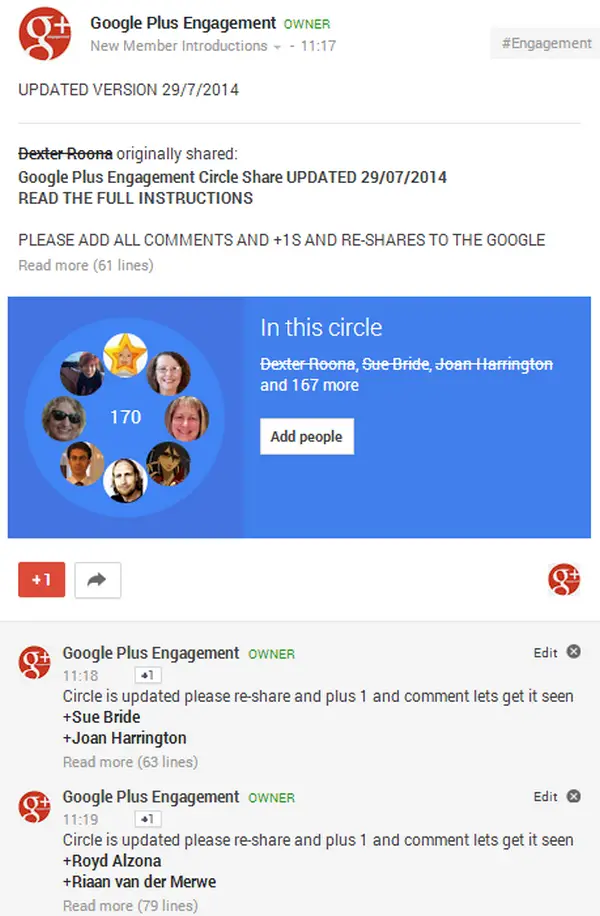
The first thing i do is to mention all the members on the new circle as a comment so that they then get emailed to say they are now added to the updated version this brings lots of them back to comment and re-share 😉 and the easiest way to do this is to use CircloScope.
Now you can mention members manually but that’s a lot of typing in +username to mention the members so just use CircloScope, there is a Free Version and you can perform this operation on the Free Version, but if your really looking to grow your followers then go for a paid version….. it absolutely ROCKS!!!! its a MUST HAVE Google Plus Tool
You can download the FREE VERSION of Circloscope from anyone of my Circloscope Guide And Tutorial Pages.
Here is the main guide index page. Circloscope Guide And Tutorial
Ok so once you have Circloscope you want to load up your Google Plus Circle into Circloscope, under Dashboard pull down to My Circles then move across to your Shared Circle and load that circle.
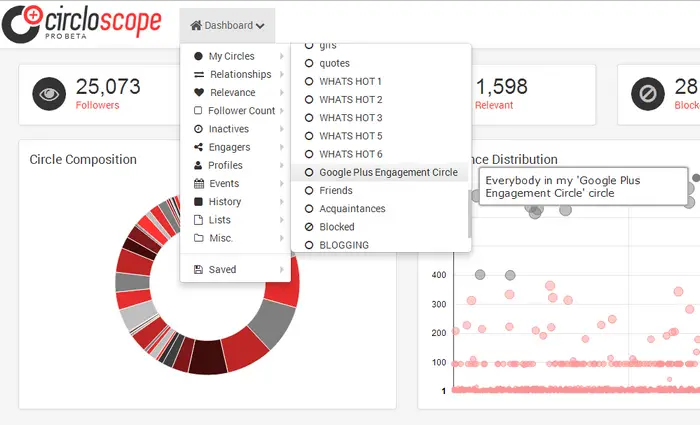
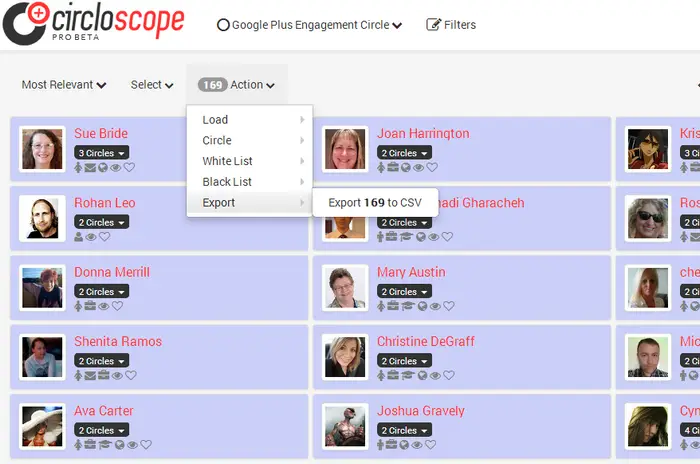
Under Select, Select All then under Action Select Export to CSV
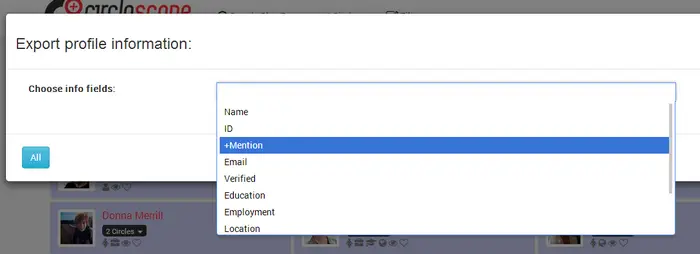
Select +Mention and click ok
Then change csv to txt and save as a text file ….. why it is just easier 😉 and Click Save.

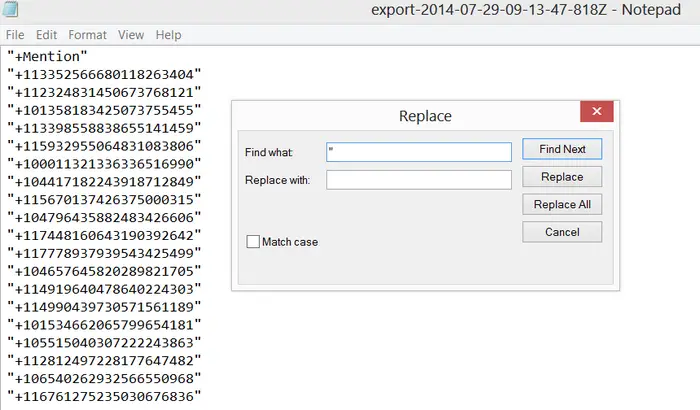
Locate your newly saved txt file then under File click on Replace and in the Find what box add in inverted commas ” and leave the Replace with box blank and click Replace All so that your left with just +account numbers. You can also delete the +mention text as well.
Now all you have to do is copy the member account numbers into your post in batches of 50 or so and save as comments
and your finished circle will look something like this
Conclusion
This is my strategy for shared circles that i created to work with my pages and my community, you can just as easily have stand alone circle shares without communities and pages all you have to do then is be more active promoting in other peoples communities to get seen , i created my way because i already have the audience from my community that will promote the circle.
Congratulations if you got to the end of this article, i know it is very involved and quite advanced, you may want to go back and read through a couple of times just to make sure you understand why i do what i do. If you do have any questions or have a strategy you want to run past me then please comment and i will be happy to reply and if you found any of this information useful then social shares would be appreciated.
To your continued Success!
Regards Dexter Roona







David Merrill 101
This looks very cool, Dexter.
I’m not a big G+ person but find it pretty fascinating. I added your circloscope extension to my Chrome browser, and am going to start figuring out exactly how to participate.
Thanks for this wonderful tool!
David Merrill 101 recently posted…Do Shiny Objects Drive Online Entrepreneurs Crazy?
Dexter Roona
Hi David thanks for stopping by and taking the time to comment.
I do have a Circloscope Guide on my site here (added as my CommentLuv comment) that will help you, the FREE Version gives you some very cool features and is a big help with growing your followers but unfortunately stops short of offering the two main features, bulk adding and removal of followers.
When you can add and remove in bulk you really start to grow your follower base.
Regards Dexter
Dexter Roona recently posted…Circloscope Guide And Tutorial